Getting Going with GIT
We have already talked about how to get an interface for working with GIT set up. Now we are ready to talk about working with GIT.
Friday, Oct 09, 2020 By Hope Snyder.
Last time, we talked about version control and one program to help you do that: GIT. GIT is an open source version control system that utilizes the cloud for storage. We talked through how to install GIT as well as making sure its communicating with R properly. We did this with the help of Jenny Bryan’s book, Happy GIT with R. But we ran out of time to talk about how to actually use GIT. Let’s get to it!
Common Commands
GIT is used through the command line (Terminal on Mac, Command Prompt or GIT Bash on Windows). The first thing you need to do to work with GIT, you need to navigate to the repository that is monitored by GIT. I have a folder on my computer called GIT that I store all of my project repositories in. That way I always go to the same place and know when I am able to use GIT commands: It must have “GIT” somewhere in the working directory.
Once you have made it to the repository within the command line, you are able to use GIT commands. To use GIT commands, you need to start the command with git followed by the command. The help command with give you a list of possible commands you can use with a short description of what the command does. However, here is a list of the commands you will use most often.
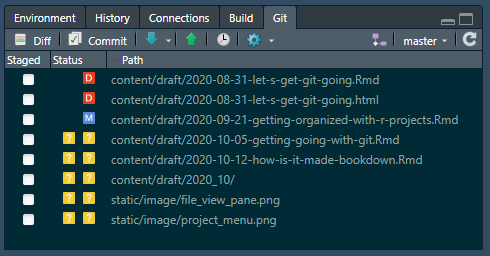
git status: Show everything in the repository that has been changed. It will highlight was changes have been staged for pushing to the cloud and which have not. It never hurts to check before you finish for the day.git commit: Records all of the changes in the file and prepares that version for storing in the cloud. You must commit files in order for them to be moved to the cloud version control system.git push/git pull: Pushing updates the changes you have made to the online repository. Pulling gets the updates from online for your computer copy.
These common commands have been integrated into the RStudio interface. In the Environment pane (it defaults to the upper right side), there is a GIT tab for projects that are set up to be monitored by GIT. In this pane, there are buttons for committing, pushing, and pulling. The main window gives the status for the repository. This pane allows you to avoid working in the command line for the most part. I have noticed that this interface has issues with larger files and large commits. Those are better done through the command line.
Working in Branches
Let’s make things a little bit more complicated. Projects that are constantly being updated and improved. However, when you start adding a new feature, you don’t want to edit the public working version. Rather you want to work on the new features in a branch. A branch is essentially a copy of the repository that you can work on and save to without overwriting the already working, public version.
To create a new branch in the command line, use the command git branch [branch_name]. Then, to move into the branch, use git checkout [branch_name]. Finally, push the branch to the cloud storage so it will keep track of this branch as well using git push origin [branch]. Now you can work and commit to this branch as normal. When you are ready to add the new feature to the public version of the project, you move into the master branch, git checkout master, then merge the two branches together, git merge [branch]. Now your master branch should have the new feature that you have been working on.
Workflow Example
Now that we’ve gone over the commands you will use the most often, I will talk through a typical workflow.
- Pull down any changes from the last time you worked. This will get all the changes from your collaborators or from other machines you may have completed work on.
- Move into the branch that currently has the new feature being worked on.
- Work and create files as you would normally.
- Commit the files to be remembered and tracked by GIT version control.
- Push up your changes to the cloud storage and they will be stored under the branch you were working in. This is very important to do so you don’t end up with incompatible versions and everything is up to date!
- If you want to merge the working branch with the master branch, run the merge command. Then commit and push that change to the cloud storage.