Let's Get GIT Going
Before you get too deep into your projects, you should have some kind of version control set up. That way, if code breaks, it's not permanent! This will walk you through the set up.
Friday, Oct 02, 2020 By Hope Snyder.
“Version control” might be a phrase you have heard a lot in coding circles. What it means is having a system set up that has a record of your coding work as it progresses. With version control, you have the current version of your program AND have access to all the old versions of your program. You want to always have access to a version of the program that works!
![]()
Using the Cloud
It would be great if there was a service already set up to take care of that for you. You don’t want to fill up your computer’s memory with a series of files! Nor do you want to filter through all those files to find the most recent version. Luckily, that is where GIT comes in!
GIT is an open source version control system that also uses cloud storage systems. Once you get this installed on your system, you will have a backup storage for your projects and files in case your computer fails for whatever reason. Also, if you have collaborators, it will track what they worked on within the project as well.
The last thing you need to use GIT is a hosting platform. There are two common free options that people use: BitBucket, and GITHub. BitBucket seems to be geared more towards professional teams rather than individual coders. There might be limitations on what you are able to do for free as well. GITHub is more applicable to individual coders and is what I use most often, but they all work mostly the same way. Your project will be remembered by GIT as a repository. You interface with GIT by cloning the repository to your machine, pulling the updates from the cloud to your machine, and pushing up the updates you make to the cloud.
GIT Alone
GIT on its own uses the the command line to run. Because it uses the command line (command prompt on Windows and Terminal on Mac), it can be a bit intimidating to use. For some reason, things done in the command line seem more permanent to me. But it is only a way to interface with GIT that will work across operating systems. That counters the intimidation factor for me.
The method to install GIT on your computer differs for each operating system.
- Windows: Git for Windows includes a GIT Bash that will open a command line ready to use the GIT commands.
- Mac: The command line tools from Xcode. To install this, open the terminal and type in
xcode-select --install - Linux: You can install GIT using your distro’s package manager.
Next, you need to set up a GITHub account. It is entirely free but there are a few restrictions on the number of collaborators you can have for a particular repository. Only so many people can contribute to the project online, but as many people as possible can clone or copy that repository to their local system. Note, you can change your username but it may cause issues down the line if you do!
GIT and R
After installing GIT and setting up a GITHub account, you should be able to use GIT with your GITHub account from the command line. However, RStudio now includes a feature that communicates with GIT directly and acts as an interface! You just need to make sure RStudio is looking in the correct place for your GIT information. Within RStudio, go to the Tools menu, then Global Options. In the pop up window, select GIT/SVN and check the executable path.
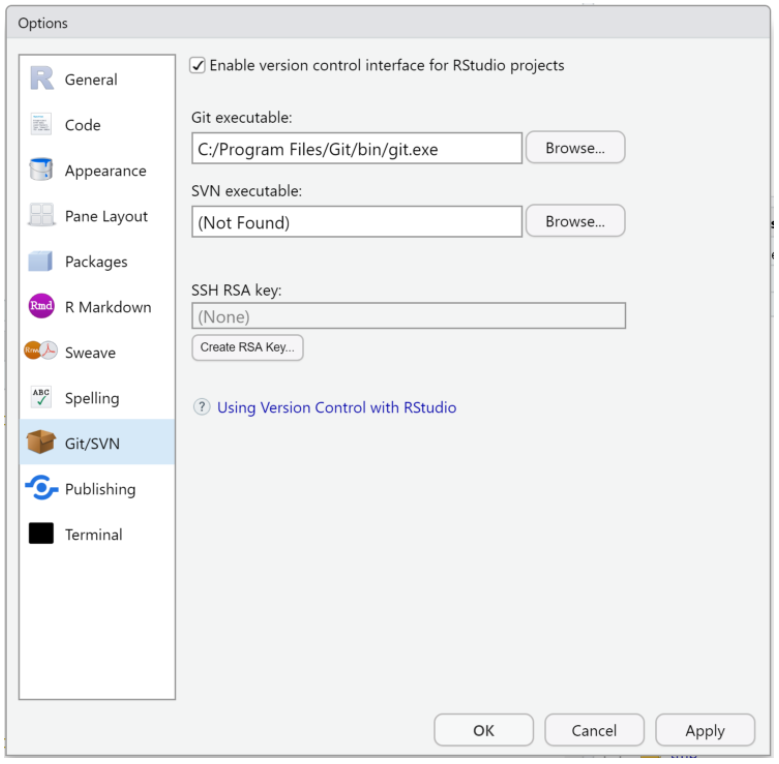
For Macs and Linux, the path is usually /usr/bin/gitand Windows is usually C:/Program Files/Git/bin/git.exe.
The second step is entirely optional: Create an SSH key. These are a pair of files that identify your machine to a server, in this case GITHub. The server recognizes that your machine is safe to communicate with. It is a more secure option for accessing your projects from GIT than a username and password. Luckily it is easy to do this from RStudio. In the same window from above, there is a small button to create and RSA key. RStudio will create the SSH key pair for you. All that is left is to give the public key to GITHub so it will pair with you computer.
Finally, you are ready to create your first version controlled project within R! You should create an empty repository on GITHub first. Call it whatever you want. The typical convention is to use underscores instead of spaces. To make R aware of the repository, start a new project in RStudio and select the option for version control. Then copy the SSH or HTTPS url into the text box. If the information automatically is inserted into the remaining fields, then everything is working properly! R will create your project and some preliminary files. I recommend making an initial push of those files and confirm they appear in GITHub before getting too far!
Next time we will go over some common GIT commands and workflows. Focus on getting everything installed and setting up your first project for now!
Note: This post was based on the amazing book by Jenny Bryant and company, Happy GIT with R. I have walked you through the steps in a different order than she does. The book provides more thorough detail about setting up GIT to work with R.